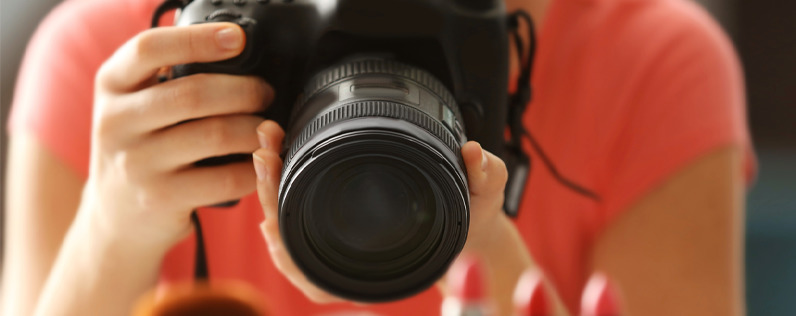
While ecommerce websites give customers the convenience of shopping on their own schedule, a website can’t replicate the physical retail experience. When customers shop in a brick-and-mortar store, they can touch the merchandise and visualize what it’ll look like when they take it home.
Adding high-quality, high-resolution product images to your page elevates your brand and gives your clients realistic expectations of their purchases. Even if you’re not a professional photographer, the right product photography setup can improve your website’s credibility and attract more customers.
- Why you need high-quality product photos
- Essentials for your product photography setup
- DIY photography setup
- Mid-range photography setup
- Photo composition tips
- Lighting tips
- How to take product photos with a low-quality camera or a phone
- Post-production tips
- Using your photos to entice customers
Why you need high-quality product photos
Your existing customers already know what to expect when they shop on your ecommerce site. They’ve bought merchandise from you and can reasonably determine what it’ll look like when they open their package.
New customers who’ve never shopped with you lack baseline expectations. High-quality product photos give them a better idea of what you offer. These images serve the purpose of visual merchandising, attracting your clients’ attention, and increasing the likelihood that they’ll buy your products.
Including product photos on your website also improves your search engine optimization (SEO) since a product description will accompany every photo. Using keywords in your descriptions can improve your rank in internet searches and lead potential customers to your site.
If you don’t have an existing product photography setup, there are a few essentials you’ll need to get started.
Essentials for your product photography setup
Product images look best online when they’re displayed against a simple backdrop — a white background, a lighting source, a camera, and a tripod. It’ll help viewers to concentrate on the product’s features but won’t compete with it. It’s also the best way to preserve the product’s color(s).
Shooting on any other color backdrop or creating an image with a busy background can distort the colors of your product or distract customers from seeing it. An exception to this rule is bottles of liquid. Photographing perfume, beverages, and other glass items against a black background is a sophisticated way to highlight the packaging. If you photograph these products in front of a light background, make sure the bottles are full to accentuate the logo.
DIY photography setup
As a new ecommerce shop owner, you may be searching for ways to save money. Luckily, you can create much of your product photography setup without purchasing a lot of equipment. Create a budget-friendly version of your most important piece of equipment by making a DIY lightbox.
Lightbox
A lightbox takes the guesswork out of product photography. It’s a box that diffuses your lighting source and serves as a simple white backdrop, giving you a vibrant product photo without distracting shadows. It makes setup quick and easy — all you have to do is put your product in the box and snap the pic. You can make lightboxes in different sizes to match the products you want to photograph.
To make your own, you need a cardboard box, packing tape, white tissue paper, white poster board, and a box cutter. Read all instructions before you begin the project to ensure success.
- Cut off the front of your box, and cut into the interior of the top and sides of it, leaving a 1-inch frame on each side. Leave the back and bottom of the box intact.
- Cut your white tissue paper into squares and cover the top and sides of your box, taping the tissue paper to each one. Your tissue paper serves as a light diffuser, so it’s important to use opaque paper for this purpose. Using thicker paper will block the light.
- Cut your poster board to fit the back and bottom of your lightbox and tape it in. Your poster board will serve as the surface for your products. Pick durable poster board for multiple product images. If it gets dirty or torn, you can always replace it.
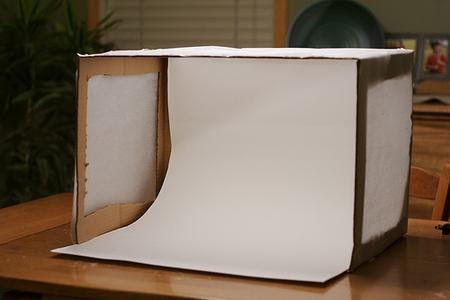
- DIY lightboxes can be made with wood and diffuser fabric if you want a more durable setting for your product images. Light diffuser fabric is white, opaque silk, or synthetic fabric. You can buy it on Amazon or at any photography supply store. Make a box frame out of wood and cover the top, left, and right sides with diffuser fabric, leaving the front of the box open. Your finished product should resemble the setup in the example above.
- You can line the back and bottom of the box with white hard boards, which are pre-finished wood panels painted white. They’re usually made of bamboo or other thin wood. You can purchase them at any home supply store. Make sure you clean the board between product shoots, which will cut down on the appearance of scuffs and dirt in your pictures.
- When shooting larger items, you can replicate a lightbox using a chair and white paper. Drape the white paper over the chair, and prop white foam core or corkboard on the right and left sides of the chair. This will deflect light, resulting in softer shadows.
Lighting
For best results, use white light. Most in-home lightbulbs and lamps feature warm light, which is not optimal. If you can, place your lightbox in front of a large window and take your photos during the day.
If you need to improvise, you can get a small ring light for less than $25. You want to aim for one with white, cool, and warm rings that you can swap out as needed. Alternatively, drape paper around white lights in a curved pattern to create a similar effect, but be mindful of fire hazards if you choose this option.
Mid-range photography setup
When you’re able, you might consider purchasing equipment for a more efficient product photography setup. You can buy a lightbox that’s more durable and flexible than a DIY model. Many pre-made lightboxes also include a lighting source, so you won’t have to light the photo yourself.
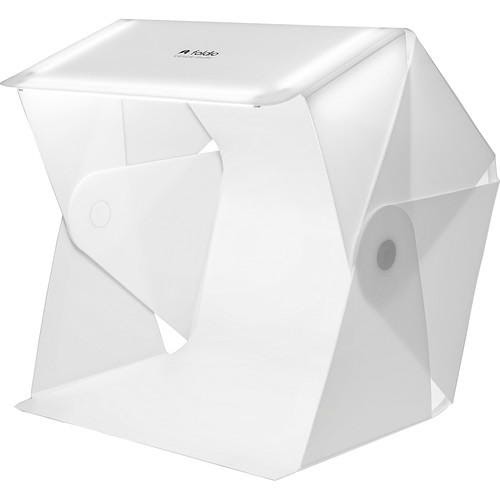
The model shown below is made and sold by Orangemonkie. It can be folded and adapted for different products, includes front lighting, and lets you change your angles to capture your product better.
Light sources
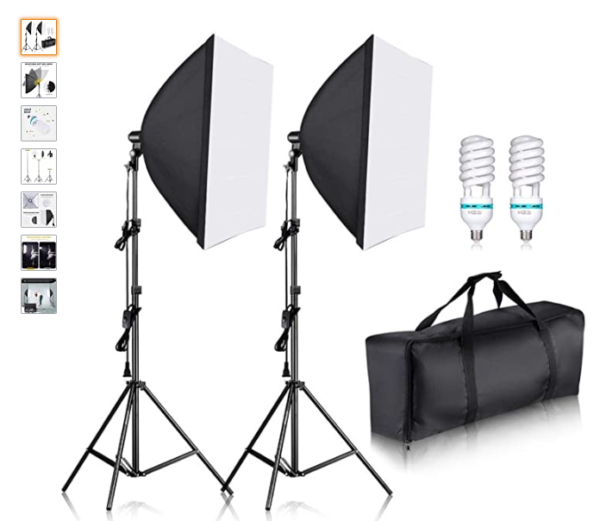
Buy a pair of professional lights for larger products or a lightbox that doesn’t have a built-in source. The kit below is from Neewer. It features adjustable heads, lightbulbs, and two 24-by-24-inch covered lights on tripods. You can play with the lighting and angles, highlighting different parts of your product. They’ll also work well for product demonstration photos with models.
Camera
Since most newer phone models include cameras that shoot high-quality, high-definition photos, you might not need to buy a professional camera. However, some digital cameras let you adjust your settings manually, which can help you compose a better photo. You can also use your camera to shoot product videos.
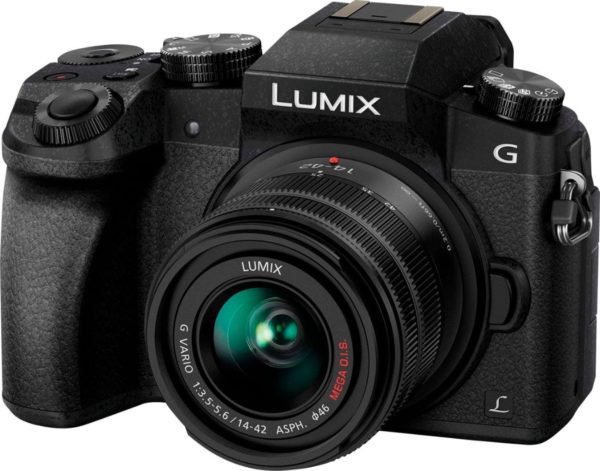
You don’t have to spend thousands of dollars on a camera and special lenses to get the job done. A mid-range model like the Panasonic Lumix below has similar manual settings to a higher-end model. Once you know how to manipulate your camera’s settings, you can achieve product and demonstration photos that rival any corporate ecommerce website.
Tripod
Using a tripod to shoot your photos can improve their quality by reducing camera shakes. A tripod keeps your camera steady so that you can focus on showcasing the product in its best light. Your product photography setup should include a tripod regardless of your preferred camera.
You can buy a tripod with a phone attachment. If you’re using a digital camera, look for one with a remote-controlled shooting attachment so you can take pictures more easily.
Most major camera manufacturers offer remote-controlled shutter release devices that can be attached to your camera.
Your product photography setup and its equipment are only part of the equation. To take professional-level product photos, you need to learn the basics of composition and lighting.
Photo composition tips
Even though you’re taking product photos and not preparing for an art exhibit, you can still apply some general artistic principles to enhance them. While your purpose is to display your products, how you do that affects how they appeal to online shoppers. Use these tips to draw customers into your ecommerce site.
Display your products prominently
For best results, set your products in the front and center of your composition. You want to draw a viewer’s eye to the product immediately. Let your desired focus determine how you position the product.
For example, if you’re shooting a pair of athletic shoes, you have many angle choices. If you want to focus on the design, you can shoot your shoes from the side. If the details and durability are the priority, you can place the shoe on its side and show off the soles. Or you can do both. Style one shoe on top of the other to show the shoes’ different features.
When your product is in the foreground, online shoppers will be drawn to it. It’ll have the added advantage of creating better balance by taking up more space in your photo.
Play with camera angles
Using a lightbox in your product photography setup gives you a simple background and softens your shadows, which is essential. Harsh lighting and darker areas can shift focus from the product itself, which can eclipse your most important features. For a simple product photo, place your product into the lightbox and adjust the lighting.
Once you’re happy with your setup, take photos from different angles. You may choose to use a head-on image for simplicity, but other angles can subtly re-create the in-person shopping experience for your online customers.
Photographing your products from above at a slight angle mimics how a person would see it while looking down at a shelf. Photographing from a side angle can highlight different textures and details within the product.
Your ecommerce site host should let you create a slideshow for each product. Use the front-facing image as your main one, and upload different photos of your product to help customers better visualize it.
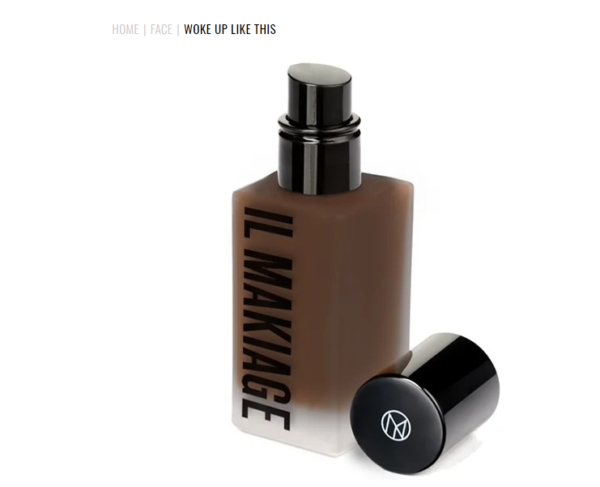
Il Makiage shoots its products at a slight angle rather than head-on, which helps draw the eye into the foundation bottle. The company positions its lid next to the bottle, creating a contrast of shapes and textures.
Pay attention to negative space
Just because you’re shooting on a white background doesn’t mean your images have to be boring. You can use negative space — the space surrounding your image — to create artistic shapes that complement your products.
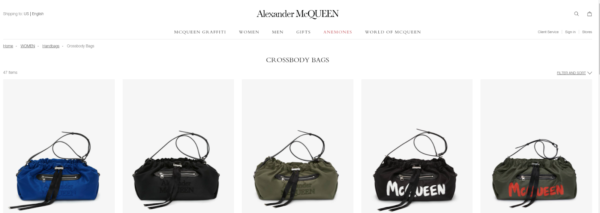
High-end designer Alexander McQueen creates the letter “Q” with its handbag handles, making the negative space more interesting and providing a subtle opportunity for branding.
Use the rule of thirds
In art, the rule of thirds applies to composition. Using the rule of thirds, you would split your image into nine boxes with three horizontal and three vertical lines. Your primary subject should be present in three of the boxes.
Apply the rule of thirds when you’re shooting with angles or when shooting from a distance. While you want to shoot most of your products head-on, consider moving your product slightly away from the center if you’re creating a feature for your website home page or shooting photos for social media.
Use the rule of odds
When shooting for feature images on your website’s homepage or creating content for social media, you might consider creative group product shots. If you’re shooting products in a group, stick with an odd number of products, preferably three or five.
Psychologically, it’s easier for a person’s brain to organize even numbers than odd numbers, so your group of four products will look boring compared to an image with only three.
Arrange your products to create visual interest. Frostbeard Studios, a small company that produces homemade candles, recently posted the following image on its blog. Since its candles are inspired by books, this photo features three popular candles in front of a book.
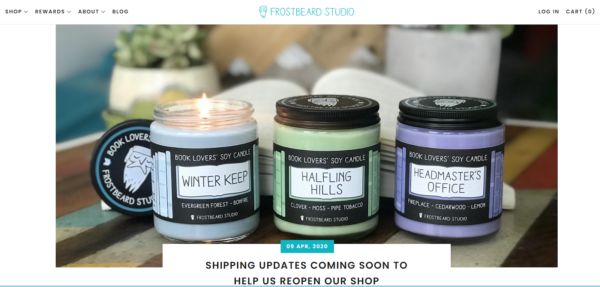
The candle on the far left side is burning and has its lid placed to the side of the jar, throwing the composition slightly off-balance, but the photo retains its symmetry through background elements.
Play with depth of field by selectively focusing
Your main product images should be in focus. Shooting on a white background makes it easier to focus the camera, resulting in crisp and sharp images. However, for artistic images that appear on your blog or social media, play with depth of field.
Depth of field means that the part of an image closest to the camera is in sharp focus while the rest of the photo is blurred. In the example above, the photographer has focused on the three candles while blurring out the book and other background elements. This allows for an interesting composition without shifting focus from your products. If you have a digital camera in your product photography setup, use its focus tool to create depth of field.
Once you’ve created your composition, you can light your photo.
Lighting tips
- Your photo should include at least two lighting sources.
- Your product photography setup should include a light diffuser, a screen or flash attachment that distributes light around your product. This will soften shadows, letting viewers focus on your product.
- Place your lights above the product and tilt them downward instead of placing the light right in front of the box for the best image quality. Front-facing light can create glares or a silhouetted effect.
- For product photos, you want to replicate the light of the sun at noon on an overcast day. It should be bright enough to capture the product yet soft enough that shadows look natural. Avoid backlighting, which can cause your images to appear darker than they are.
- Balance your lighting using a combination of backlighting and front-lighting. When setting up your lights, take test shots and adjust until you find the setup that works best for you.
- You can fix your color balance in post-production using photo-editing software, though some errors are impossible to fix. Starting with high-quality images will reduce the amount of time you’ll need for editing and the chances that your photos will need to be redone.
How to take product photos with a low-quality camera or a phone
As a new entrepreneur, you might not have the resources needed to get a professional camera as part of your product photography setup. You may be wondering how to take high-quality product photos with a low-quality camera or your phone.
If you have a newer smartphone, your camera can probably take pictures that rival those shot with a mid-range digital camera. Or you may be working with older equipment or a basic digital camera with no manual settings. Here are some ways to maximize the equipment you already have.
Keep your background simple
When you’re shooting product images with a phone, make sure you’re using a white background. Since you can’t adjust the focus, shooting your products in a busy background can distract the eye. Create a DIY lightbox as detailed above to shoot your products.
Mind your camera settings
Avoid using the front-facing camera. It’s made for selfies — not getting a good angle on your products. Stick with the default camera angle.
Whether you’re using a phone or a low-level digital camera, stay away from the wide-angle option. It can distort the image and leave the customer unsure about the product, increasing the chance that they’ll return it later or simply move on to a competitor with better pictures.
Turn off your flash and use external lights
Using a flash will cause shadows that can obscure the product’s features, so you want to turn it off. Even if you’re using a lower-quality camera, it pays to invest in lighting. When you’ve set up external lighting sources, your camera should be able to capture a higher-quality photo.
Don’t use your zoom feature
The zoom feature of your phone tends to make pictures look more pixelated or blurry. Instead of using your zoom, move closer to the product and take multiple photos. You can also crop your images with a photo editing program, which mimics a zoom without sacrificing your resolution.
Shoot from multiple angles
You should always shoot your products from multiple angles for more options. This lets you highlight different features. It also gives you more options if some of your photos end up being blurry.
When you shoot from multiple angles, you get a feel for which ones produce the best product images. What works with a higher-quality camera might not turn out well with a lower-quality camera or a phone. Set up some test shoots with products around your house to get familiar with your camera’s settings.
Clean your lens
When you use your phone to take photos, you’ll likely have some sort of debris or even fingerprints on your lenses. These imperfections might not be noticeable until you blow up your pictures and see fuzzy areas that appear to be out of focus.
Before shooting your products, use a specialized cloth-like microfiber — to clean your camera’s lens. You can purchase it online, along with a bottle of lens cleaner.
Post-production tips
Once your shoot is over, it’s time to edit your photos. Your aim should be to make your products look similar to how they’ll look when they arrive at your customer’s door.
When you’ve uploaded your photos, check the coloring. If it looks too warm or too cool, use the auto-color feature of your editing software and see how it looks. If auto-coloring doesn’t result in an accurate image, you might have to adjust the color balance settings yourself.
Other settings to look at include brightness and contrast. You can adjust these settings to counteract low light. Your changes should be subtle. Don’t move the settings too much, or it could distort your product.
Don’t use filters on your final photos. If you’re creating a blog photo or a social media post, you can apply different filters for visual interest, but the images on your shopping page should be clean and free of filters.
Crop out unnecessary space
If you’re using a lower-quality camera or a phone, you might need to crop your photo. Use a cropping tool to adjust your composition and enhance product focus. Keep in mind that cropping your image will lower the resolution. If your ecommerce site host requires a minimum resolution, save the cropped image as a copy to see how it impacts the resolution.
Using your photos to entice customers
When you’ve perfected your product photography setup, you can take beautiful images of all your products, draw attention to your website, and tempt customers with visual merchandising.
First, decide whether you’re going to do it yourself, making a temporary lightbox out of cardboard or a more durable model with wood and diffuser fabric. If you can spring for a lightbox, pick one that meets your size requirements and decide if you want one with a built-in light.
For best results, use natural light and supplement with other light sources as needed. If you’re using other light sources, make sure you have diffused the light with a flash attachment, a screen, an umbrella, or a specialized lighting kit. Position your lights at an angle to diffuse the light.
Play with different compositions. Take front-facing photos to serve as your main product image, and take pictures from other angles to create texture and visual interest. For blogs, feature images, and social media, play with composition by using the rule of thirds, the rule of odds, and depth of field.
Your photos serve as the window into your shop, enticing people to come in and buy your products. Start your product photography setup now to elevate your ecommerce shop.


